Hi everyone…Trish here today with a focus on magnifying your art (digitally, of course). Michelle’s freebie is at the end of the tutorial.
I love, whenever I am able, to add a bit of realism to the elements on a scrapbook layout. For example, a real magnifying glass will magnify and distort anything underneath it. You can easily create this same effect digitally in Photoshop/Elements using a magnifying glass element and a very simple technique.
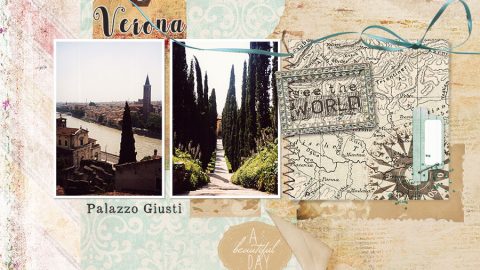
In the layout below, I used the magnifying glass element from the Adventure Page Pak.

You can see that the word art has been magnified and distorted like it would be if this were a real magnifying glass.
Here’s how in Adobe Photoshop/Elements:
- Open image editor
- Open paper for layout
- Drag magnifying glass and element you want to magnify. Move and re-size as desired.
- In layer palette, drag element layer below magnifying glass layer, if not already there. You can have other types of elements, text, or even just a background. For simplicity in this tutorial, I am just going to use the word art (not showing the paper).
- Make a selection of what is under the magnifying glass using the elliptical selection tool, while holding the shift key to make a perfect circle (elliptical selection tool is in the same tool bar as the rectangular selection tool-right click on this tool to select the elliptical tool) . Make sure you are on the layer of the element that you wish to magnify.
- Select Filter>Distort>Spherize

- In Spherize dialog make sure the Mode is set to Normal and adjust the slider bar to the desired amount of magnification. I used 75% for this example.

- Click OK. Ta da! It is just that easy.

- If you have more elements under the magnifying glass, this process needs to be repeated for each one by clicking on that element’s layer in the Layer Palette, making a selection of the glass shape, and using the Spherize filter. Don’t forget the background, too. If you are magnifying text, you must right click the text layer in the layer palette and choose Rasterize Text (or in PSE, Simplify Layer) before you can apply a filter to it. If you forget to do so, a window will pop up that gives you this option. Click OK.
- Important note: even if the element is just a little bug you still need to select the whole magnifying glass portion to get the proper distortion on the bug. If you make no selection it assumes the selection is the whole layout so improper distortion will also occur.


Use your imagination and see what you can do with this technique. You could magnify a bug or other detail that you wish to emphasize or part of a photo.
Some of our “glass” tags or medical slides would work similarly with this technique, as in our As Time Goes By Pak...I just wouldn’t distort them as much since they aren’t magnifying.

And, for you to be able to play along, Michelle made a similar ScrapOver QuickPage Freebie (download link at bottom of post). She also included a separate tag for you to distort and drag beneath the glass (or to fill with other stuff). Karen added a dog sticker and punch label under hers.


See you tomorrow for more fun!
Adventure ScrapOver Free Download by Michelle Shefveland (Expired Sunday, April 2010). Have fun! Trish
 |