Using CottageArts.net Fully-Layered PSD
Templates and
Changing Colors using Color Variations and Color Picker Tool
Using Adobe Photoshop Elements 2.0
(Adobe Photoshop and Photoshop Elements 3.0 very similar)
This tutorial will use the
layout “Iris.psd” from our Simply Shabby CD and will focus on
adding photos, text, changing the colors of the papers, leaves, photo corner, dragonfly,
and text, and show how quickly you can customize a layout to accent
your special photographs and journaling. The steps use Photoshop
Elements 2.0. Photoshop and PSE 3.0 are very similar.
-
Open Adobe Photoshop Elements
-
Clicking on the top menu,
select File/Open and open “Iris.psd” from your CD drive in the 12x12
Layouts folder in Simply Shabby CD.
-
SAVE LAYOUT: Save
layout as a .psd file on your local hard drive to a different name,
such as TeachChild.psd, in this example. Save periodically throughout
your design process. Saving files to your hard drive will increase
processing speed, as reading from your hard drive is much faster than
reading from a CD drive. It is also a good idea to save design work
often, as to not lose your creations!
-
ADD PHOTO: Let’s add a
photo from your file system and drag it to the layout so it can start
to look like YOUR creation!
-
Click on the top menu
File/Open and browse your system for a particular photo you would like
to add.
-
Enhance the photo by using the
Enhance options on the menu bar, such as Adjust Lighting, Color,
Contrast to optimize the quality of your photography. In my example,
I added a layered mat to focus attention on my son (tutorial coming
soon).
-
Using the Select Tool, click
on the photo and drag it into your open layout
-
Now, simply move and resize
photo to desired location and size on top of script photo mat. Once
the photo is resized to fit the mat, it’s a good idea to link/group
the photo mat, photo, and photo corner, so you can move and resize
them as one unit.
-
ADD TEXT: Unless you
want to use the default title as is, now is a good time to delete the
journaling/title layers from the layers palette (see our tutorial on
deleting and duplicating layers for more detailed instructions). They
are in the templates as inspiration for you, however, it is likely you
will want your own font, color, and special thoughts recorded.
-
Add text layer in selected
font, text color, and point size. Also, at this time, you can add
some special layer styles, such as a drop shadow (my preferences for
drop shadows are Layer Style/Drop Shadow/Low with Style Settings of
120 degrees and shadow distance of 12 pixels). I added a drop shadow
in my example, as the text was a light color and this helped it to
“pop” off the page.
-
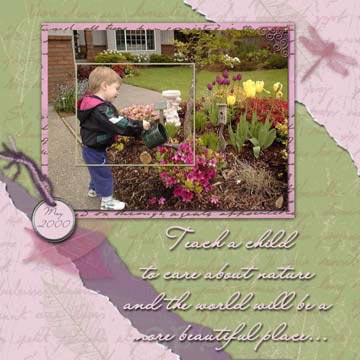
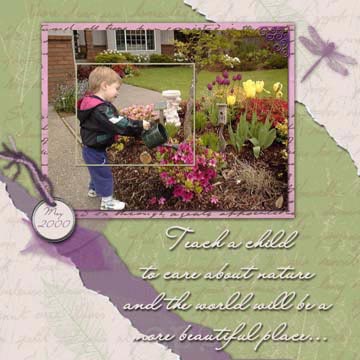
This is how the layout looks
at this point in the design process:
-
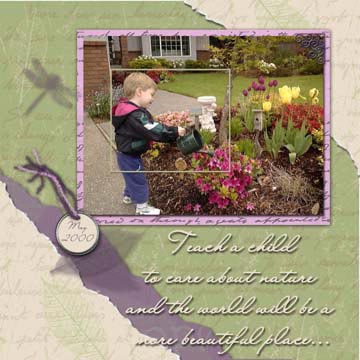
CHANGE COLORS: This
looks pretty nice, but you’d like to customize it a little more to
your own liking.
-
Let’s move things around a
little, change some colors and see what we end up with.
-
For a different design, move
the photo over to the left and the dragonfly over to the right.
-
Move the tag and fibers up a
little and to the left (group all the layers to help with the move:
tag text, upper and lower fibers, metal tag, and inner tag).
-
Now, let's change the color of
the rose script photo mat a tad to match the photo better. A
neat technique to do this is in the Enhance menu.
-
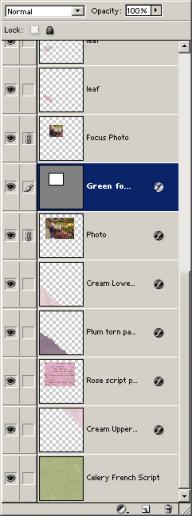
Select the layer in the layer
palette and then on the menu select Enhance/Adjust Color/Color
Variations. The dialog box below will pop up. For this example, click
on Decrease Blue and Darken and the subtle change will occur. Click
OK to make the changes to your layer. You can make major color
changes, if desired, using this tool.
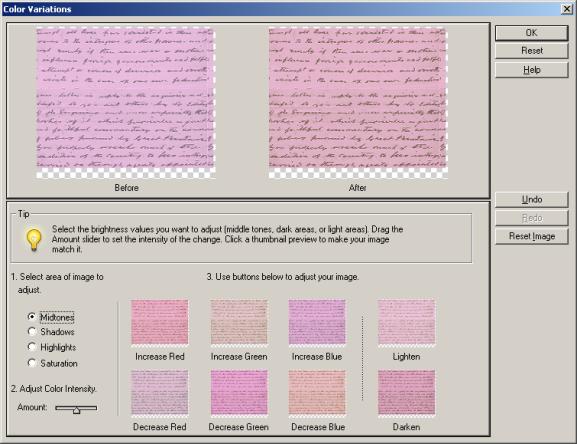
-
Use this technique on the
leaves, dragonfly, tag, and cream lower and upper script papers. For
the leaves and dragonfly the following buttons were clicked: Decrease
Blue, Decrease Green, and Lighten to change to a rose color. To
modify the cream paper and tag to a soft rose, click Decrease Green
and Increase Blue.
-
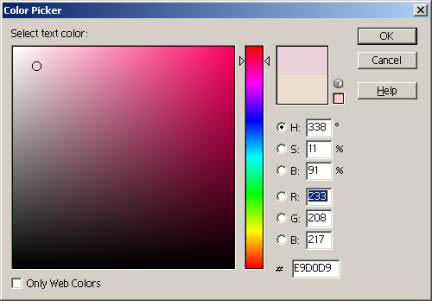
Finally, adjust the color of
the text to match the soft rose paper by making the text the active
layer. Select the text tool and click on the Text Color Box at the
top of the menu. The Color Picker Tool will appear. Using the mouse,
click anywhere on the soft rose paper and the color will pull up, as
shown below. Click OK and the color of the text will automatically
change.
Michelle Shefveland, CottageArts.net, Copyright
2003, All Rights Reserved |