|
Font
Download, Un-Zip, and Installation Instructions
using
Microsoft Windows Operating System
|
One of the
most addicting elements of scrapbooking is collecting fonts! But, how
do you download, un-zip, and install them? Here’s a quick
tutorial on how to make this experience a breeze. We used the Windows
XP operating system for screenshots; other Windows operating systems
would have the same instructions, just a little different look.
Our designer
Scrap.Words are created
with mixing various commercial fonts to save you time and effort.
Check them out
here.
|

Impact font filled with paper. Layout supplies
here
|
|
What you’ll need
-
Internet connectivity
-
Microsoft Windows
You’ll learn how to:
|
|
Download Font
from Internet site
One of my
favorite sites for downloading great fonts for scrapbooking is
Scrapvillage.
They don’t have all the banner ads that the big free font sites have,
and they cater to scrapbookers. Please remember that free fonts are
for personal use only. If you use fonts in a commercial capacity, a
great site to consider is
MyFonts,
where they have a large collection of commercial fonts, and some
affordable bundles.
Most font
download sites have an option to download Windows and Mac fonts. If
using Windows, choose Windows or True Type fonts download option.
Most font sites download a Zip file you need to extract with WinZip or
another unzipping utility, however, Scrapvillage downloads the True
Type font file itself making the process even easier. Note: these are
Windows compatible only.
For this
tutorial, we will be saving a zipped font from
Dafont
(Jump Start, created by Typearound), so you can see how to unzip a
file. Windows XP comes with its own Zip utility (Extraction Wizard),
but they are available for download for other operating systems.
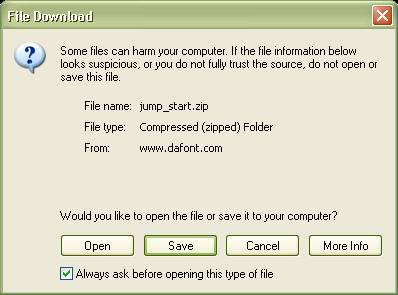
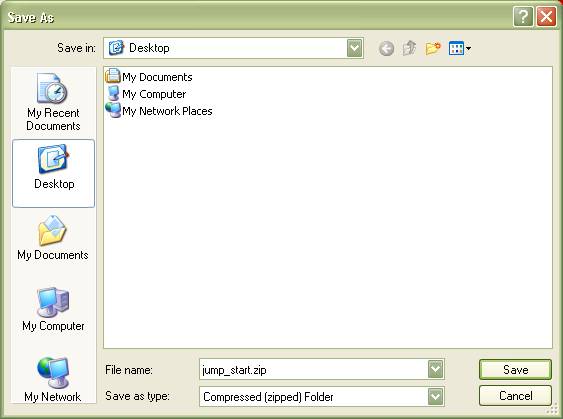
First,
search a font site for a font you want to download. When you
find one, click on the specific font type you want to download.
File Download dialog box (above right) will appear. Choose
Save and Save As dialog box (right) will open. Click Desktop Icon on
left. Click Save. When complete Click Close.
|
|
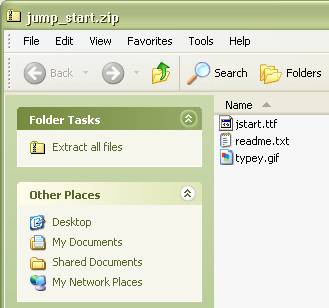
Un-Zip Font File
Most font
sites have you save a Zip file of the font. To un-zip, click on
jump_start.zip icon on Desktop. The dialog box to the right will open. Click Extract all files
in Folder Tasks, and the Extraction Wizard dialog will open.
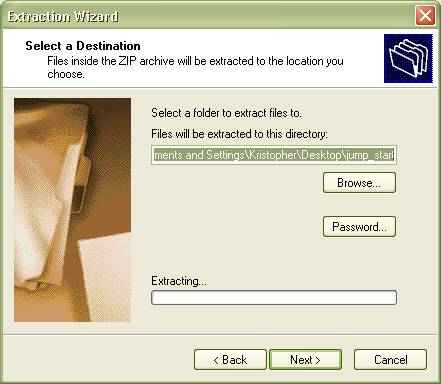
Note: for
instruction purposes, it is easiest to show saving fonts on Desktop,
however, it is best to create a specific font folder to store all
these fonts, such as C:\My Documents\Fonts, so your Desktop doesn’t
get filled with fonts. If you save fonts to Desktop, periodically
delete them off the Desktop after installation, as they aren’t needed.
Select a
folder to extract files to: defaults to Desktop. Click Next.
Follow dialog instructions. Click Finish when done. |
|
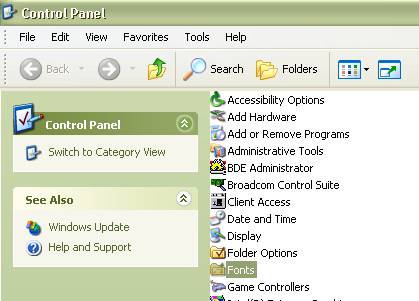
Install Font
Go to
Start>Settings>Control Panel.
Double Click on Fonts folder (your
system might be set up to display thumbnails in Windows Explorer, so
you might see an image with “Fonts” listed below it – that’s fine). |
|
|
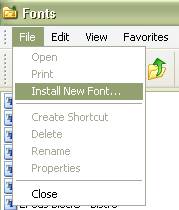
Choose File > Install New
Font. |
 |
|
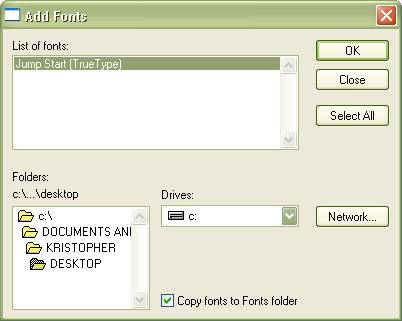
In dialog
box, locate font saved on desktop by double clicking C: in folders
window at lower left. Then click Documents and Settings. Then click
Desktop and font just saved will appear in List of fonts window. Click
Select All to highlight all fonts in window. Click OK to install
highlighted fonts. Fonts will be installed.
Open image
editor or word processing package, and the newly installed font will
appear in font list!
Happy
creating!
Michelle Shefveland
|
 |
|
 |
|
