|
Using ScrapOver™
Templates
with Corel® Paint Shop Pro® Photo
(most earlier/later versions follow similar steps)
(See same tutorial
using Adobe Photoshop Elements)
|
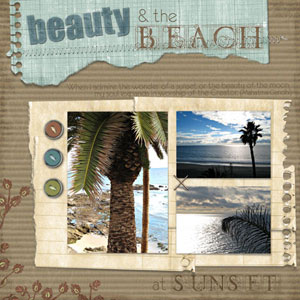
Our ScrapOver templates are a hit
because they are simple to use and help
you get so much done in little time! Here’s a quick breakdown of the steps to use them
with Paint Shop Pro. Most other image editors that are
compatible with PNG formats would follow
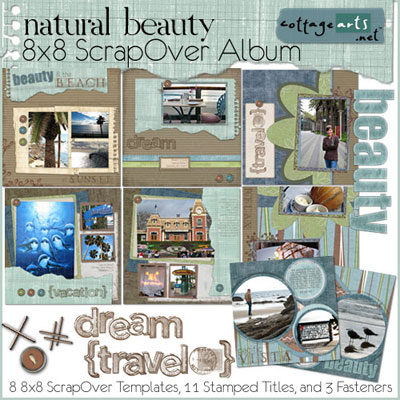
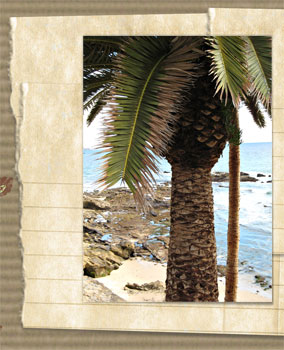
similar steps. Our sample is using the
versatile
Natural Beauty 8x8
ScrapOver Album,
which includes eight designer-pieced 8x8 templates,
word art and extra elements.
See our selection of Downloadable
ScrapOver Templates here
|
|
|
What you’ll need:
-
Corel® Paint
Shop Pro®
(version Photo X2 used in
tutorial)
-
ScrapOver template of choice
-
Photo(s) in digital
format
You’ll learn how to make:
|
|
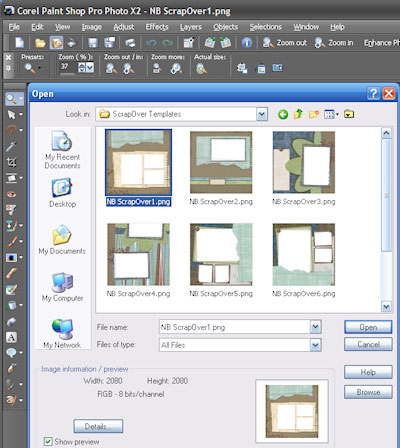
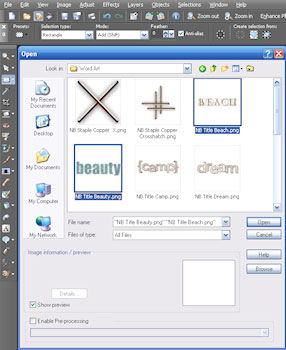
Open Paint Shop Pro Photo
Open a
ScrapOver template within Paint Shop Pro
Photo:
Choose File>Open and browse your system for the
template you want to open. We chose
NB ScrapOver 1.png from our Natural
Beauty Album.
Click
Open.
Notice the
transparent openings for your photo, which is what makes
ScrapOver templates so easy to use! |
|
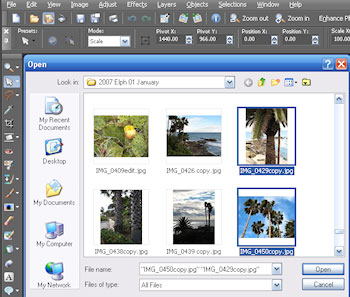
Open
Photo(s)
Choose File>Open and browse
your system for the photo you want to
open. Click OK to open.
Tip: To open
more than one photo in the same folder,
simply hold the Ctrl key and click
multiple images, as I did.
|
|
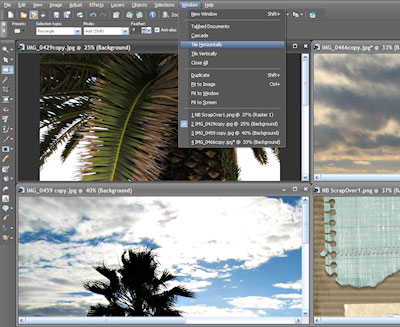
Tile
Images
As shown in the main window, there
are 3 images, plus the template open.
Paint Shop Pro opens all images in same
window.
Tip: Tile
the open images to see them more easily.
Select Window>Tile Horizontally (or
preferred layout).
|
 |
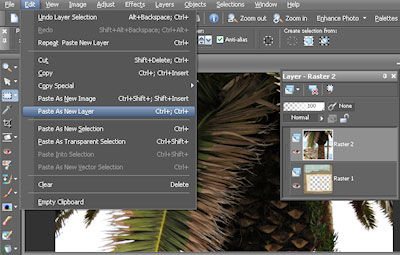
Paste
Photo(s)
onto Template
-
Click on one
of the photos to make it the active file
(will come to front in main window of
screen).
-
Select
Edit>Copy.
-
Click on
Template image.
-
Select
Edit>Paste as New Layer to paste photo
on template. See in Layer Palette at
right that photo layer is on top of
template.
-
Repeat for
other images.
-
Close all
images except template (which should
have all images pasted onto it).
|
 |
|
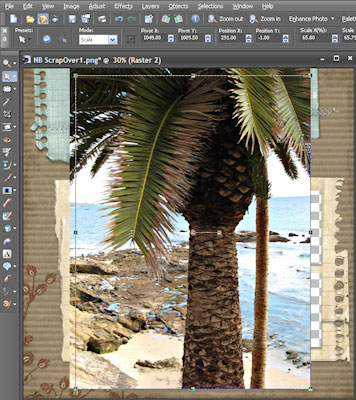
Resize and Reposition Photo(s)
With the Pick Tool selected (second
down), drag the corner pulls of the photo by
dragging inward to size to photo opening in
template (dragging outward decreases
quality of image, so use carefully).
Also, rotate if needed.
If desired, rename this layer (named
Layer 1 or Raster 1) to 'Photo 1' to help distinguish it.
To Rename, right click on it in the
layer palette, select Rename, and give
it the name of your choice.
Enhance your photo, as needed, such as
adjusting the levels,
brightness/contrast, or curves, etc.
Select Adjust>Brightness and Contrast>
and select option desired. Paint Shop
Pro also has awesome menu led Smart
Photo Fix (Adjust>Smart Photo Fix).
Repeat for
all photos.
Tip: You can
increase or decrease the visible size of
the active image by using the scroll key
on your mouse. Try it!
|
|
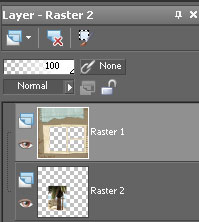
Move Photo(s) beneath Template
In the Layer
Palette at lower right of screen, select
this photo (the layer named Layer 1 or
Photo 1).
Click on the thumbnail image and drag
downward in the layer palette, so it is
now below the template.
Voila! The photo is now perfectly sized and
has an awesome realistic shadow around
it.
Repeat
steps if there are openings for more photos.
|
|
|
Add Title Art & Elements (optional)
Many of our
ScrapOver and Quick Page Album Kits have
additional title art and elements for
you to make the page even more your own.
This kit in particular has many
different vacation words, staples, and
button. As with opening multiple photos,
hold the Ctrl key while clicking on
multiple files.
Add these to
the page as you added photos. Position
and size as desired. You can even change
the color (Select Adjust>Hue and
Saturation>Hue/Saturation/Lightness).
In the
sample shown, a staple, 2 pieces of
title art, and 3 buttons were added (two
were re-colored with technique above).
|
 |
|
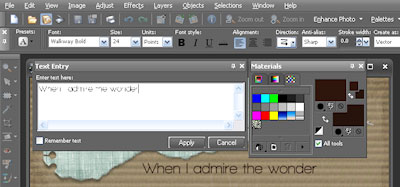
Add Text
To add journaling, click the Text Tool
(A icon) on the tool bar and choose font and settings
from Tool Options menu across the top of
screen. Be sure you are on a layer above
the photo and template layers in the
Layer Palette. In the Materials Palette
at right of screen, click on Background
color and set to desired color.
Tip:
Set Stroke Width to 0 if you don't want
a border around your text using the
Foreground Color.
Place cursor in
position on layout where you want title to appear.
In Text
Entry dialog, type journaling,
adjust position and size, if necessary.
Click Apply to accept.
Add additional text in
different fonts and colors, if desired.
|
|
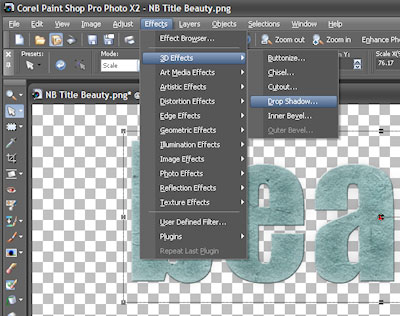
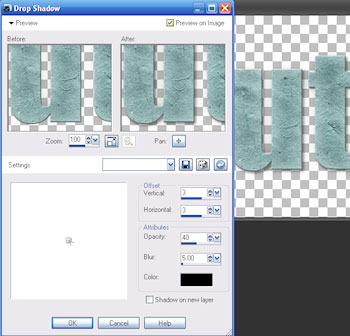
Add Drop Shadows (optional)
If desired, add drop shadow to title art
or elements, for added dimension, like
on the Beauty title art.
Select
Effects>3D Effects>Drop Shadow.
In dialog,
set a small shadow from top left
(default). I like to use 3, 3, 40% for
my settings. Click OK.
Tip: Click
the top box, Preview on Image to see
what the drop shadow will look like.
|
|
|
Save and
Print Layout
You’re done! Save as
a .pspimage format file to retain layers (choose
File>Save As>pspimage) and
high quality jpg for printing. Print at any
square size on photo paper using the
highest quality setting. This set is
8x8, but some of our templates are
12x12. If you do not
have a wide format printer and want to
print at 12x12, check out our
printing article to learn about
other options.
Save as .jpg
format to share on the
Internet (resize to 72 dpi for this option). Good luck
enjoying the ease and versatility of digital!
Happy
creating!
Michelle
Shefveland and Team |
|
|
